PROJECTS / VIRTUAL ON SCREEN KEYBOARD
2020
Languages:
This project focuses on the implementation of a program able to display the keys of a keyboard on the screen and allow user with the help of a web camera to select any character when the desired color (or finger) is "virtually" inside the renctangle (ROI) which corresponds to a key.
Feel free to check the following video on Youtube for a better and visual understanding of this project and it's concepts.


Define the lower and upper color for the color-tracking part.
lower_color = np.array([75, 169, 45], np.uint8)
upper_color = np.array([96, 255, 255], np.uint8)
In order to get this range we can use OpenCV's trackbars. A code snippet on how to set trackbars can be found on project Hand Deection and Finger Counting.
At first we are defining the rectangles corresponding to each key by setting the dimensions width and height as well as the distance between two consecutive keys.
import numpy as np
width, height = 65, 65
dist = 15 # Distance between two consecutive rectangles

# Initial position of text in frame
start_x = int((video.shape[1] - (10*width + 9*dist))/2)
start_y = 50We are defining a string with name alphabet which contains numbers from 0 to 9, the letters of the english alphabet and some extra characters. These extra characters correspond to actions-commands.
# Set a string with letters, numbers and symbols
numbers = "1234567890" # String containing 10 numbers (0-9)
alphabet = "1234567890QWERTYUIOP:ASDFGHJKL?ZXCVBNM,.<->[_]"

# Strings used in basic-'command' buttons
symbol_strings = ["BACK", "DELETE", "ENTER", "Aa", "SPACE", "NUM2SYM"]The extra symbols ( < - > [ _ ] ) which are the 6 final alphabet symbols are used to create some extra actions during the virtual typing. The explanation of the these symbols is the following.
| Symbol | Explanation |
|---|---|
| < | Delete one character (BACK) |
| - | Delete all (DELETE) |
| > | Newline character (ENTER) |
| [ | Change between capitals/lowercase (Aa) |
| _ | Leave one character empty (SPACE) |
| ] | Change between numbers/symbols (NUM2SYM) |
We are finding the size of each alphabet character so that we can place it n in the middle of the corresponding rectangle. Use cv2.putText in order to put text on screen.
# Find the size of each character based on font, font-scale and font-weight
text_size = cv2.getTextSize(text, font, fontScale, fontThickness)
text_width = text_size[0][0]
text_height = text_size[0][1]

# Text position for each character
text_x = int((width - text_width)/2) + x
text_y = int((height + text_height)/2) + yIn order to draw the rectangles and display (draw) the symbols defined on the previous strings we are using two basic functions. One for the basic alphabet symbols and numbers (draw_letters(let_index, text)) and one for the last 6 extra characters (draw_extra_chars(let_index, text)). In order to display each row on a new line we use a loop with if conditions. For example in order to display the second row of the keyboard the if condition (based on the alphabet length) will be
# Draw the rectangles
width, height = 65,65 # For the rectangles
for i in range(alphabet_length):
	if i >= 10 and i < 21:
		x, y = start_x - int(start_x/1.5) + (i-10)*(width + dist), start_y + (height + dist)
		cv2.rectangle(frame, (x, y), (x + width, y + height), (255), 2)

# Draw the letters
if let_index >= 10 and let_index < 21:
	cv2.putText(frame, text, (text_x-10, text_y), font, fontScale, text_color, fontThickness)
One the other hand if we want to draw the rectangles and words corresponding to a special character, for example word BACK then we should add the following code.
# Draw the rectangle
if i==40:
	x, y = start_x, start_y + 5*(height + int(1.5*dist))
    width += 70

# Draw the word "BACK"
if let_index==40:
	cv2.putText(frame, symbol_strings[0], (text_x-32, text_y-5), font, fontScale, text_color, fontThickness)
Finally the keyboard that we are see on our screen will have the following structure.
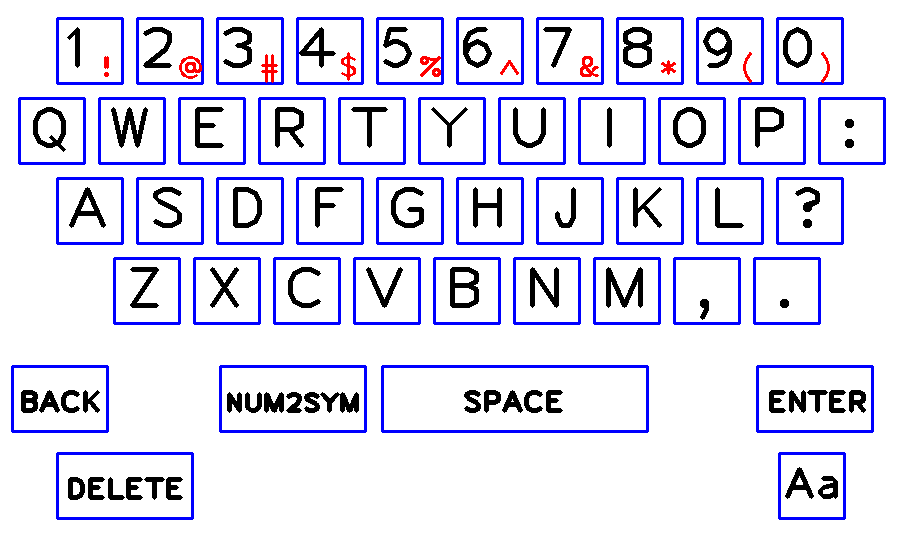
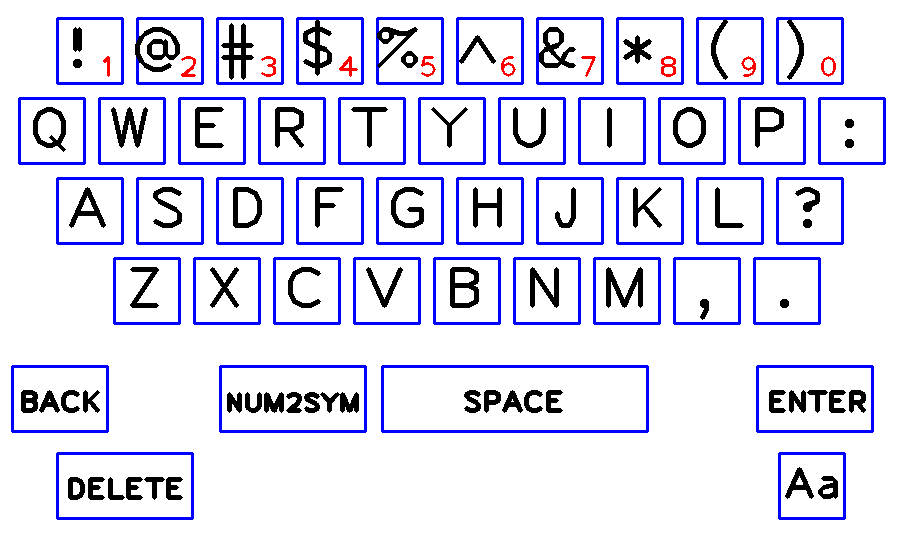
If user wants to select symbols like ! or @ instead of numbers on the first row, he should move the desired (detection) color inside the rectangle containing the word NUM2SYM. The keyboard layout will change to the following.
An extra black window-frame containing the selected characters (output message).
paper = np.zeros((250,1000,3), np.uint8)
cv2.namedWindow("Paper")
# Starting position of text in "Paper" frame
start_write_x = 5
start_write_y = 35
In this window someone can see the following :
An example will be the following image.
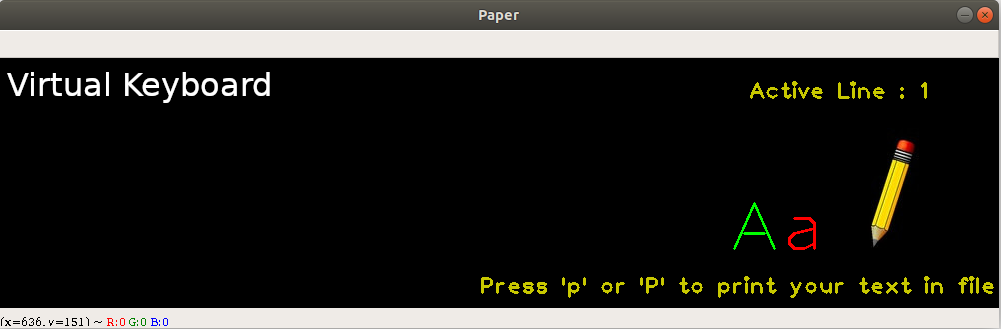
Every time someone presses 'p' or 'P' the message is being saved on a txt file with name in format :
messagenum_DD-MM-YY_HH:MM -      num : Number of message in file
                          - DD-MM-YY : Current date (day-month-year)
                          -    HH:MM : Current time (hour:minutes)
e.g. message1_26-07-20_21:30.txtFirst of all find the max contour of the desired (detection) color in the frame. Find the center of the max contour and check if center is inside a rectangle of the rows with rectangle containing letters, numbers and symbols in the frame.
contour = max(contours, key=cv2.contourArea) # Find the maximum contour each time (on each frame)
M = cv2.moments(contour)

# Draw each contour
cv2.drawContours(frame, [contour], -1, (0,255,0), 2)
# Find each contour center
if int(M["m00"])!=0:
    cx = int(M["m10"] / M["m00"])
    cy = int(M["m01"] / M["m00"])
    cv2.circle(frame, (cx, cy), 2, (0,0,255), 2) # Draw center of each contour

	# Check if center is inside a letter box per row of rectangles in frame
    if cy > start_y and cy < start_y + height:
    	for k in range(10):
        	if cx > start_x + k*(width+dist) and cx < start_x + k*(width+dist) + width:
				let_index = k
Every 20 frames let user to add a new letter-character (beep sound).
if frames == 20:
    frames = 0

for i in range(len(alphabet)):
    draw_letters(i, letters[i]) # Use of draw_letters function
	if (let_index == i):
		my_text += letters[i]
For a better and visual understanding of this project and it's concepts, watch the video on Youtube.
